Hello everyone! I hope you are all well and having a good week. Today's post is a little bit different to the norm as I have a guest blogger and it is the very talented Abby Bonner from Make-up by Abby.
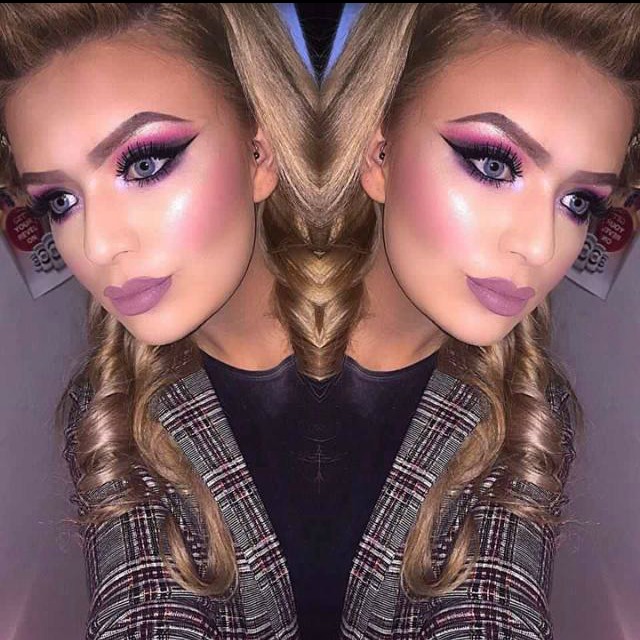
She is going to talk you through this amazing look she done on her pretty face a few days ago and also give a few tips and tricks in regards to make-up brushes. Based in Donegal, Abby is a freelance make-up artist with a wealth of talent and I am delighted to be featuring her on the blog. She has been an absolute pleasure to communicate with and for anyone based around the Letterkenny area, Abby will also be doing make-up in Pure Boutique for the upcoming proms so gals ... get booking! You can check out her Facebook page HERE to see other looks she has created / make an appointment. With a following of over 5,000 people, she is definitely doing something right and I wish her nothing but success for the future, I have every faith it will be a bright one!
"The first and most important step for any make-up application is preparation. Before you begin to apply any make-up to your face ensure your face is clean, dry, and has no residue from previous make-up.
For a dramatic look like this, I tend to being with the eyes. It saves the hassle of messing your base with fall out from the shadows"
EYES

- "For the eyes in this look, I began by using a small strip of sellotape on the corner of both eyes, going diagonally up from the lower lash line. This gave me a perfect crisp wing.
- I started by priming my eyes with Mac paint pot in 'soft ochre'. This cancels out any discolouration in the eyes and helps to prevent creasing.
- I then went in with a transition shade, I always use a warm orangey brown for this, for this look I used Inglot rainbow shadow in 102.
- Next I went in with Inglot shadow in 362, it's a light pink colour, and I blended this into the transition colour.
- I then went in with 'Blackout' from the Naked 2 palette, and used a small pencil brush to add to the outer corner and my crease. I kept adding colour and blending until I got my desired intensity.
- Next I went in with Inglot shadow 339, a matte grey shadow, and used a flat brush to pack this on to the entire lid. I went in with 'blackout' again to replace any colour that may have been lost with the grey.
- Next I took Inglot body pigment in 214 and used a fluffy blending brush to apply this into my upper crease, towards the brow bone. I took a clean flat brush, sprayed my brush with Mac fix+ and applied Inglot sparkling dust 02 to my brow bone. I then took a small angled brush and Inglot gel liner 77, and created a dramatic wing.
- At this point I removed the tape to reveal a clean sharp line.
- Next I took my LA Splash glitter glue and applied it right on my inner corner, and tapped Inglot stardust pigment 111 on top. I applied my favourite mascara Too Faced 'better than sex' to my top lashes and applied dramatic false lashes. I used the untouchables by Revel lashes.
- After this, I went ahead and done my base make-up before I did my lower lash line. For the lower lash line, I went in with the gel liner on my water line and used the matte grey Inglot 339 shadow to smoke it out. I then took a small blending brush and went in with the 214 pigment to further blow out the lower lash line.
- Finally I added mascara to the lower lashes and that's the eyes finished"
FACE

- "After cleaning up all the fallout, I went in with Mac strobe cream to prime.
- I used Illamasqua rich liquid foundation, I love this foundation as it doesn't contain any SPF therefore there will be no flash back in flash photography. This is quite a heavy foundation, but personally I like using a heavier full coverage foundation when doing such a dramatic eye.
- I used Mac prolongwear concealer to brighten up under my eyes, then set it with Bare Minerals concealer in 'well rested' to set it
- I then used Mac studio fix powder to set my whole face.
- To contour, I used Mac mineralise skinfinish natural in medium deep, and applied this beneath my cheek bones, on the temples and to along my hairline on my forehead.
- I used a pink blush, Inglot 52.
- To highlight, I took an eyeshadow brush, sprayed it once again with Mac fix+, and applied Inglot sparkling dust 02, and applied it along the tops of my cheek bones and down the centre of my nose. Wetting the brush helps to intensify the loose pigment"
LIPS
"My favourite part of this whole look it the lips. I used Gerard Cosmetics liquid lipstick in 'Invasion'. It applies like a gloss, but dries matte within minutes. A matte lip is very complimenting for a look like this, it really helps to define the lips, and its very long wearing"
BRUSHES
"For any good make-up application, brushes are the most important element. My favourite brand of brushes to date are the Blank Canvas brushes and Zoeva brushes. It is also important to keep your brushes clean in order to ensure a smooth application every time. Personal make-up brushes should be deep cleaned once a week, of course if you are applying make-up on other people they should be cleaned after every use. I use lukewarm water and baby shampoo to clean mine, then let them dry naturally. In between deep cleanses (or clients), my favourite brush cleaner is Cinema secrets. It completely cleans the brush and dries within seconds, ready to be used right away"
Thanks for reading everyone
Until next time,
Emma
x
all the products inglot is dealing in, like brushes, liners, eye shadows color, they are just beyond imagination in terms of quality, their quality will force you go for this brand product
ReplyDeleteWhat I like the best part of Melanotan Kaufen is that we can use it at our own comfort at home and we get best results too.
ReplyDeleteThanks for this useful and informative blog. This helps me a lot to do an attractive makeup of mine. I really appreciated it. God Bless you!
ReplyDelete